Chess is the perfect excuse to learn the Rust-to-browser pipeline. The rules are strict enough to demand real correctness, the interface is rich enough to deserve real polish, and the whole thing fits in two files you can hold in your head: one Rust crate, one web component.
This course builds a complete chess game that runs entirely in the browser. There is no backend and no framework — the rules and the computer opponent are Rust compiled to WebAssembly, the board is a single Lit component, and the two halves talk across a boundary made of nothing but strings. By the end you’ll have shipped the pipeline that carries systems code into a web page, and tested it at three layers on the way.
The game you’ll ship
A playable chess app: click-to-move with legal-target highlights, a computer opponent, algebraic move history with figurine notation, automatic save and restore, a help drawer for players who don’t know the rules, and a finish built from modern CSS — pieces glide with the View Transitions API, dark mode derives from two hue variables, and the layout reflows with container queries.
Every lesson ends with a working app. The companion repo,
rust-wasm-chess, carries a
git tag per lesson, so any checkpoint diffs cleanly against your own work —
and if you want to play the finished game before writing a line, clone it
and run npm run dev.
The architecture, on one page
Two pieces, and a deliberately narrow bridge between them:
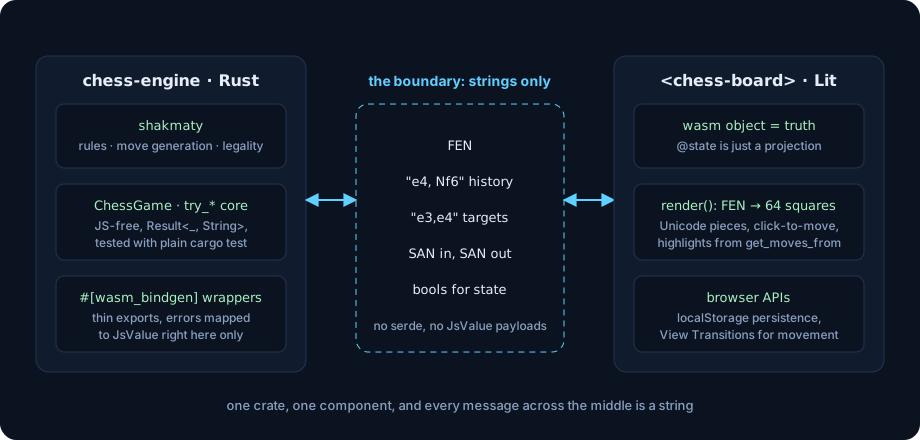
The Rust crate keeps its logic free of JavaScript types so plain cargo test
covers it, and exports a surface of FEN strings, SAN moves, and
comma-separated squares. The component never duplicates game state: the wasm
object is the source of truth, and Lit’s reactive fields are a projection of
it. That one decision is why the tests in this course are so honest — there
is no mock engine anywhere.
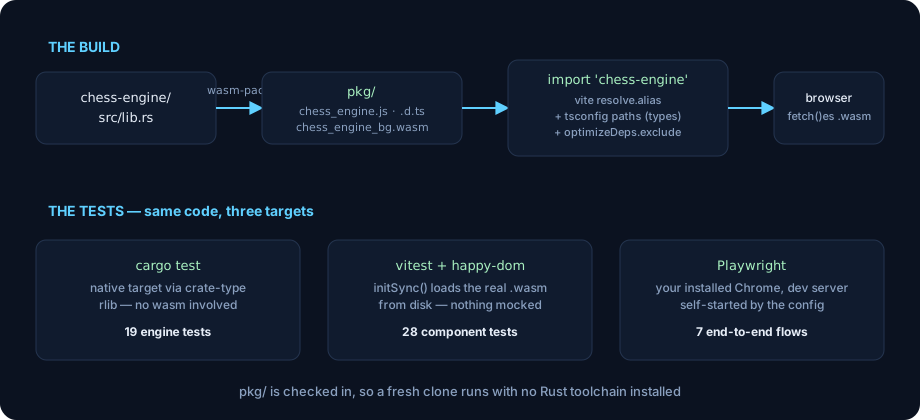
The build works the same way in dev, production, and tests:
The lessons
- The game you’re about to build
- A crate built for two targets
- Teaching the crate the rules
- Opening the wasm-bindgen boundary
- Vite meets wasm
- From FEN to pixels
- Click to move
- The cheapest opponent that works
- A game that survives reload
- The tests that earn their keep
- Testing against the real wasm
- Proof in a real browser
- The wow layer
- Build a real opponent — an optional bonus: evaluation, alpha-beta search, and difficulty levels as knobs you built yourself
Lesson 8 deserves a word. The opponent this game ships with is about twenty lines of Rust, and the lesson is honest about exactly what those twenty lines buy: a deterministic capture-biased move picker that will happily trade its queen for a pawn. Understanding why it’s cheap is what makes the bonus lesson land, where the same interface grows a real searching engine.
Who should take this
You’ve written some Rust and some TypeScript, and you want them in the same running program: a working answer to “how does my Rust actually get into the browser, and how do I test it once it’s there?” The chess is the vehicle, not the subject — every rule of the game itself is delegated to a library, on purpose. If what you want is to write move generation from scratch, this is not that course (though the bonus lesson gets you halfway).
How to take this course
You build the app in your own repo, starting from an empty directory in lesson 1. The companion repo is the answer key, not the workbook.
Each lesson explains its idea, shows every new pattern once, in full, and closes with a Build it table listing each file the lesson touches. Done when gives you an objective check — a test count, a behavior you can see — and the answer key link shows the lesson’s complete change as a diff between two tags. Open it after your check passes, or when you’re genuinely stuck, not before you’ve tried. If you diverge too far, any tag is a clean reset point. One optional challenge per lesson goes further than the walkthrough.
After checkmate
The free course is complete on its own: you end with the finished game, its full test suite, and a bonus opponent that can actually punish a mistake. The natural follow-ups — shipping the app to static hosting, playing both colors over the network — are yours to explore, and the repo’s tags give you a stable base to build from.